¶ Introduction
As a cornerstone of an installed Definition immersive acoustics system, the DP1 processor provides the core signal processing functions needed in a scalable, network-connected server chassis. A number of audio signals may be connected over the Dante audio network from a mixing console or other sources, which are then processed and fed to a number of loudspeaker "drive" channels feeding Definition loudspeakers throughout a performance venue.
The DP1 is offered in two variants, which differ only in the number of augmented active acoustics paths and loudspeaker drive channels:
- DP1-1x16 will drive 16 separate loudspeaker channels, but will render only one acoustical virtual space at a time.
- DP1-2x8 will drive 8 separate loudspeaker channels, but will render two acoustical virtual spaces at a time.
For larger installations, multiple DP1 processors may be combined to create an effectively unlimited number of loudspeaker processing channels. Depending on the topology of the system design, the DP1 may be used for the following functions:
¶ Augmented active acoustics
The natural acoustics of the performance space may be selectively and controllably varied and "lifted" by routing signals through the DP1 from an audio console or other source. Each source may be placed inside a virtual "space", and augmented reflections created and rendered through the room loudspeakers. Virtual spaces have stereo inputs, and are typically created such that panning a source with a console varies the reflections in the space similarly to moving a source left-to-right on stage.

The DP1-1x16 contains processing for one virtual space at a time. Conversely DP1-2x8 contains two separate virtual space paths, so sound sources can be placed in either simulation simultaneously. The Space Preset Library is created and available following the Definition commissioning process, and typically contains variations of the listening room with different reverberation times or collections of early reflections. Space presets may be loaded into the virtual space channels as desired by the user.
¶ Adaptive bass control
DP1 continually samples the subwoofer drive signals from an installed audio system, and produces complementary and adaptive signals to drive numerous low-frequency control loudspeakers distributed around the room. This creates tighter, more controlled sub-bass response for an improved audio experience and minimizes variations in low-frequency response between different positions in the room. It is especially effective in smoothing the response of subwoofer energy in raised seating areas or balconies.
¶ Surround mixing matrix
Definition allows “dry” immersive audio inputs from a mixing console to be routed, timed and distributed properly to the same loudspeakers used for adaptive acoustics. This allows “surround” type mixing, console-based effects or theatrical audio content to be distributed spatially throughout the room with no additional investment in hardware.
¶ Safety & Regulatory
¶ Important safety instructions
- Read these instructions.
- Keep these instructions.
- Heed all warnings.
- Follow all instructions.
- Do not use this apparatus near water.
- Clean only with a dry cloth.
- Do not block any ventilation openings. Install in accordance with the manufacturer’s instructions.
- Do not install near any heat sources such as radiators, heat registers, stoves, or other apparatus that produce heat.
- Do not defeat the safety purpose of the polarized or grounding-type plug. A polarized plug has two blades with one wider than the other. A grounding type plug has two blades and a third grounding prong. The wide blade or the third prong is provided for your safety. If the provided plug does not fit into your outlet, consult an electrician for replacement of the obsolete outlet.
- Protect the power cord from being walked on or pinched particularly at plugs, convenience receptacles and the point where they exit from the apparatus.
- Use only with the accessories specified by the manufacturer, or sold with the apparatus.
- Unplug this apparatus during lightning storms or when unused for long periods of time.
- Refer all servicing to qualified service personnel. Servicing is required when the apparatus has been damaged in any way, such as power-supply cord or plug is damaged, liquid has been spilled or objects have fallen into the apparatus, the apparatus does not operate normally, or has been dropped.
DO NOT ATTEMPT TO OPEN THE APPARATUS ITSELF; IT IS NOT USER-SERVICEABLE.
WARNING: The apparatus is supplied with an AC mains power cable. Depending on the voltage model ordered, this cable is configured with the most common AC mains connector for that voltage. If the connector is not compatible with the local AC mains receptacle, employ a licensed electrician to re-configure the cable with the proper connector. Ensure that AC power supply has a properly grounded safety ground. Failure to follow this warning could cause equipment damage, injury, or death.
¶ Regulatory
This device complies with part 15 of the FCC Rules. Operation is subject to the following two conditions: (1) This device may not cause harmful interference, and (2) this device must accept any interference received, including interference that may cause undesired operation.
This equipment has been tested and found to comply with the limits for a Class A digital device, pursuant to part 15 of the FCC Rules. These limits are designed to provide reasonable protection against harmful interference when the equipment is operated in a commercial environment. This equipment generates, uses, and can radiate radio frequency energy and, if not installed and used in accordance with the instruction manual, may cause harmful interference to radio communications. Operation of this equipment in a residential area is likely to cause harmful interference in which case the user will be required to correct the interference at his own expense.
Do not attempt to power down the server without pressing the power button on the front panel of the server. Arbitrarily removing AC power from the server without a proper shutdown may render the server unusable or damaged.
¶ Hardware Installation
The DP1 is a digital signal processor that receives a number of networked audio feeds and outputs signals prepared for driving loudspeakers in a Venueflex Definition active acoustics system. The DP1 has network-based Dante audio inputs and outputs.
¶ Mounting
The DP1 may be mounted in a standard 19-inch equipment rack, or placed on a desktop. In either case, do not cover or obstruct the ventilation ports on the front and back of the unit. The DP1 product is intended to be remotely controlled and monitored using a network connection and the VUI software, and audio routed similarly over a network. To minimize the presence of fan noise in the performance environment, we recommend mounting the DP1 processor in a remote equipment room or another area where server fan noise will not be intrusive.
¶ Power connection
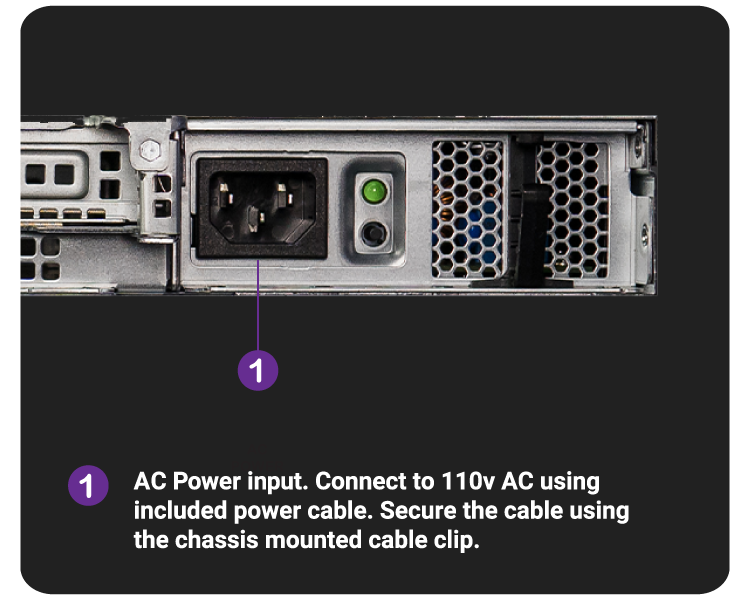
Connect the supplied power cord to the rear main power input. Do not use any power source other than the AC adapter supplied with the server, as doing so may damage the unit and void your warranty!
¶ Network connections
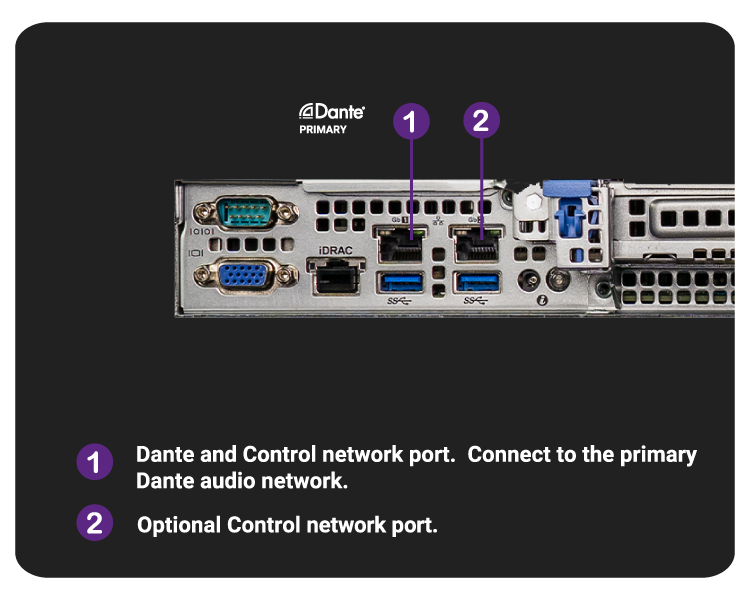
The DP1 has two ethernet ports on the rear side of the chassis. Port 1 (ONE) is used for Dante network audio and can also be used for remote control from your external computer using the VUI software. Port 2 (TWO) is for future use and should remain disconnected at this time. Regardless, do not connect both ports to the same network at the same time as this may cause unstable operation!
Note: Redundant Dante network operation is not supported at this time.
Note: DP1 is only compatible with Dante systems running at a sampling rate of 48kHz.
¶ Starting up
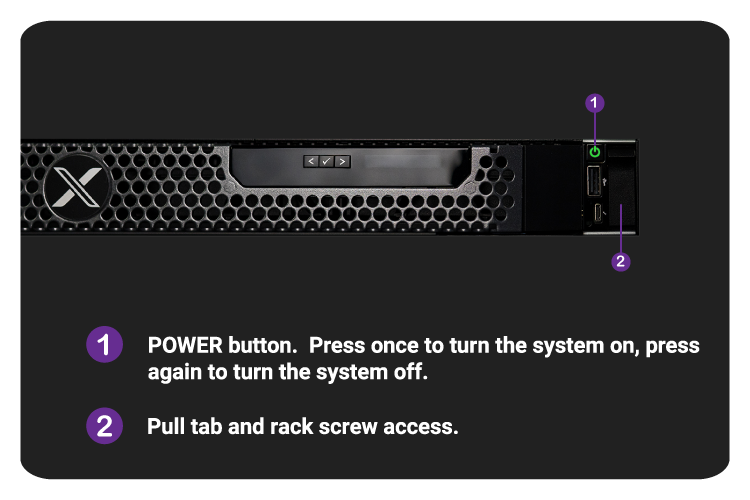
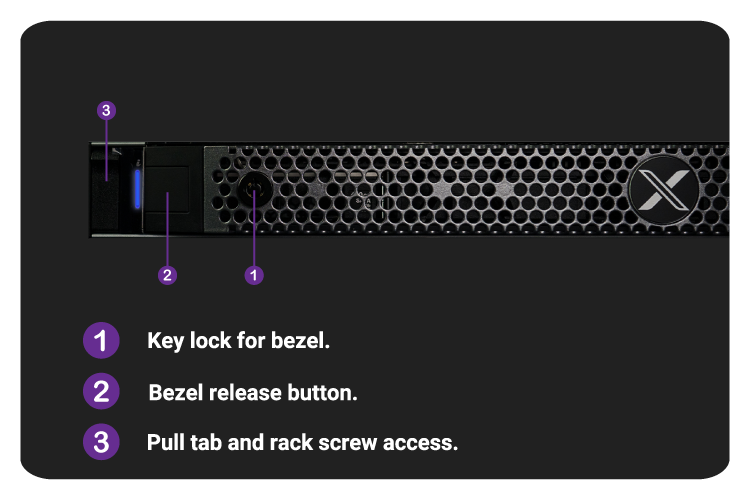
After connection to an appropriate power source, the POWER button may be momentarily depressed to start the processor. Upon connection of a power source, the status LED on the left side of the server will glow blue after some time which is normal. Upon power-up, the POWER button will glow green. At any point, momentarily depress the POWER button to turn the DP1 off, and wait for the unit to power off. Do not shut down DP1 by removing power to the unit before safely turning off the unit with the power button. Only remove power after the system has been safely shut down using the POWER button and the LED behind the POWER button is no longer illuminated.
A glowing orange LED on the left side of the server indicates a potential issue with the server. Refer to the LCD screen on the bezel for the status message, and then contact Venueflex Support for further assistance.
¶ Setup and Configuration
¶ Control software installation
VUI is software offered by Venueflex to control and monitor DP1 installations from your computer running Windows or MacOS, and is required for proper setup and use of the DP1 processor. Download the latest version of VUI here. Contact your dealer if you need access. The following instructions assume that you already have VUI installed. If not, please refer to the VUI Getting Started guide.
Dante network audio channels must be patched using the Audinate Dante™ Controller software application. This application may be downloaded for free from Audinate™ and is available for Windows or MacOS.
¶ Network setup
The computer containing both VUI and Dante Controller should be connected to the same network subnet as the DP1 processor for proper operation, along with any source or destination audio devices (e.g., Dante audio from your mixing console and amplifiers that will drive Definition loudspeakers). Use a properly-configured Dante network switch or other Dante-compatible network topology for best operation.
Note: Unless you have configured the DP1 to utilize a manual IP addressing scheme, the processor will attempt to acquire its IP address and network configuration from a DHCP server on the network. If no server can be found, the processor will select a zeroconf address (169.x.x.x). A manual IP address can be configured within VUI if desired.
¶ Connecting VUI to the processor for remote control
TODO: Update graphics with DP1, and multiple processors
The following steps will guide you through connecting to your DP1 processor.
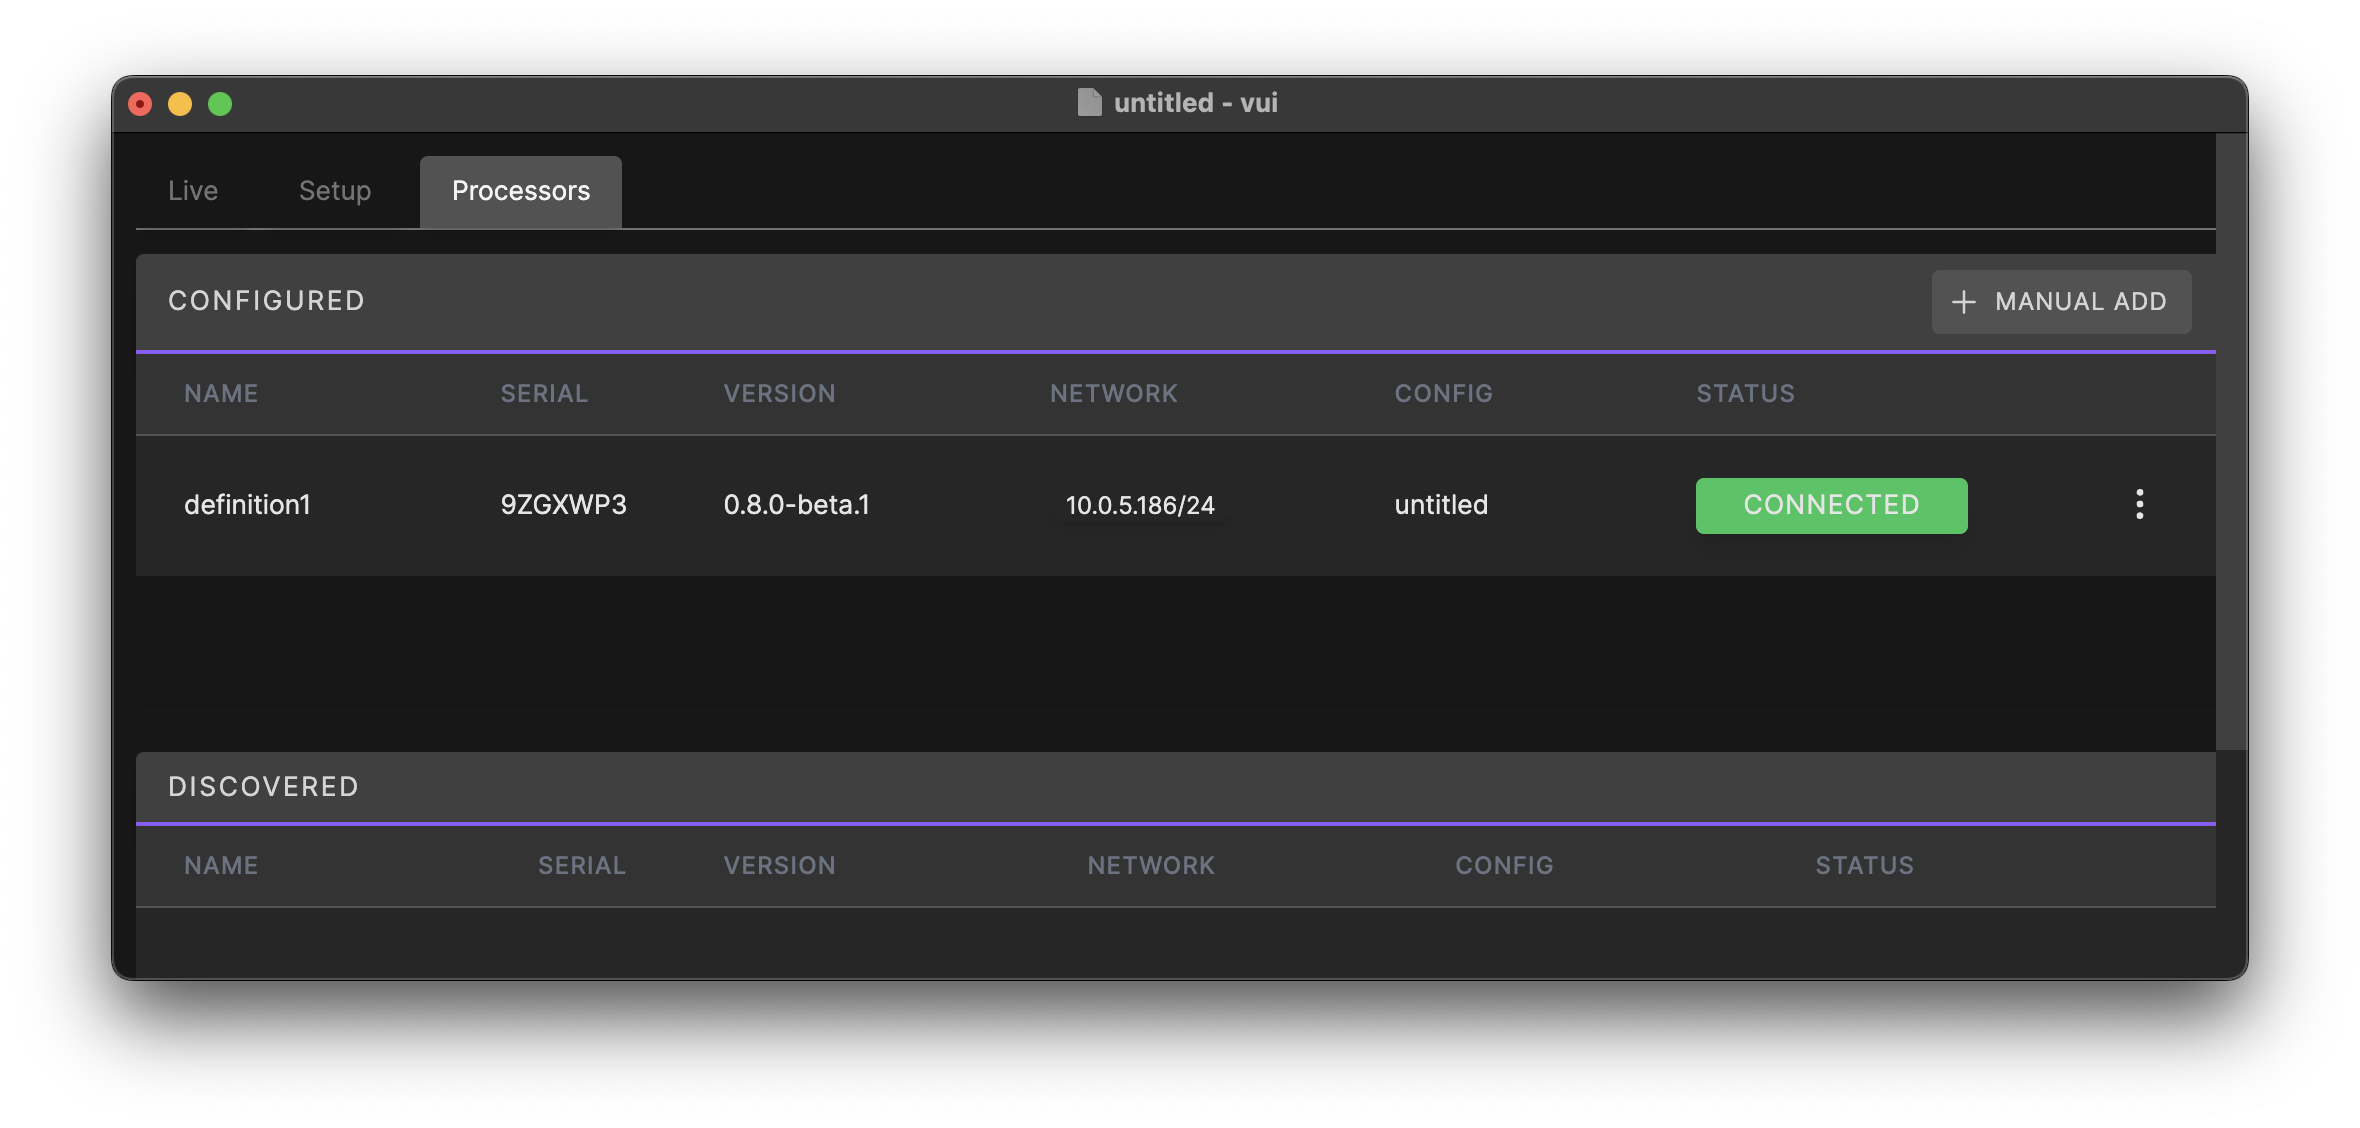
- Navigate to the Processors tab in VUI and search for it under the Discovered list. If the DP1 does not appear, check your preferred network interface.
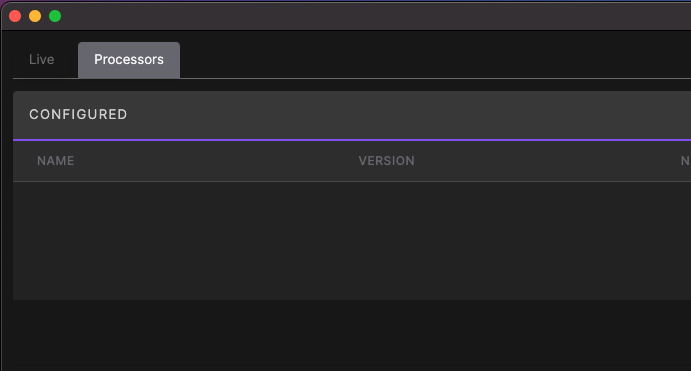
- Click the blue Discovered icon next to the DP1 processor. Optionally you can click the triple dot icon to the right and choose Connect. Either option will work.
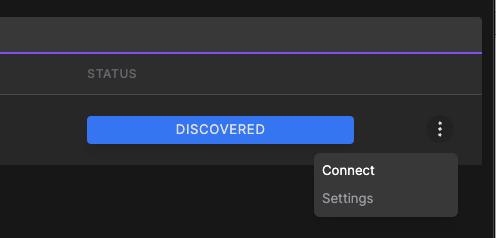
At this point you should see your DP1 processor listed under the CONFIGURED table. You have now successfully connected to the processor. If you weren't able to find your processor under the Discovered list and connect, refer to the Manual Connection section below
¶ Manual connection
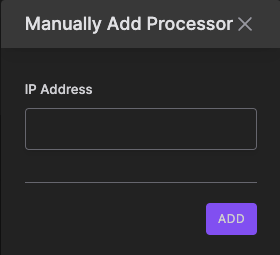
If the DP1 processor resides in a different network subnet from the computer running VUI, you'll need to use the Manual Add button at the top right corner of the Processors page. You will need to know the IP Address of the DP1 to use this option. If the DP1 appears in Dante Controller, you can find the IP Address there under the Device Info tab.
¶ Connecting to audio signals
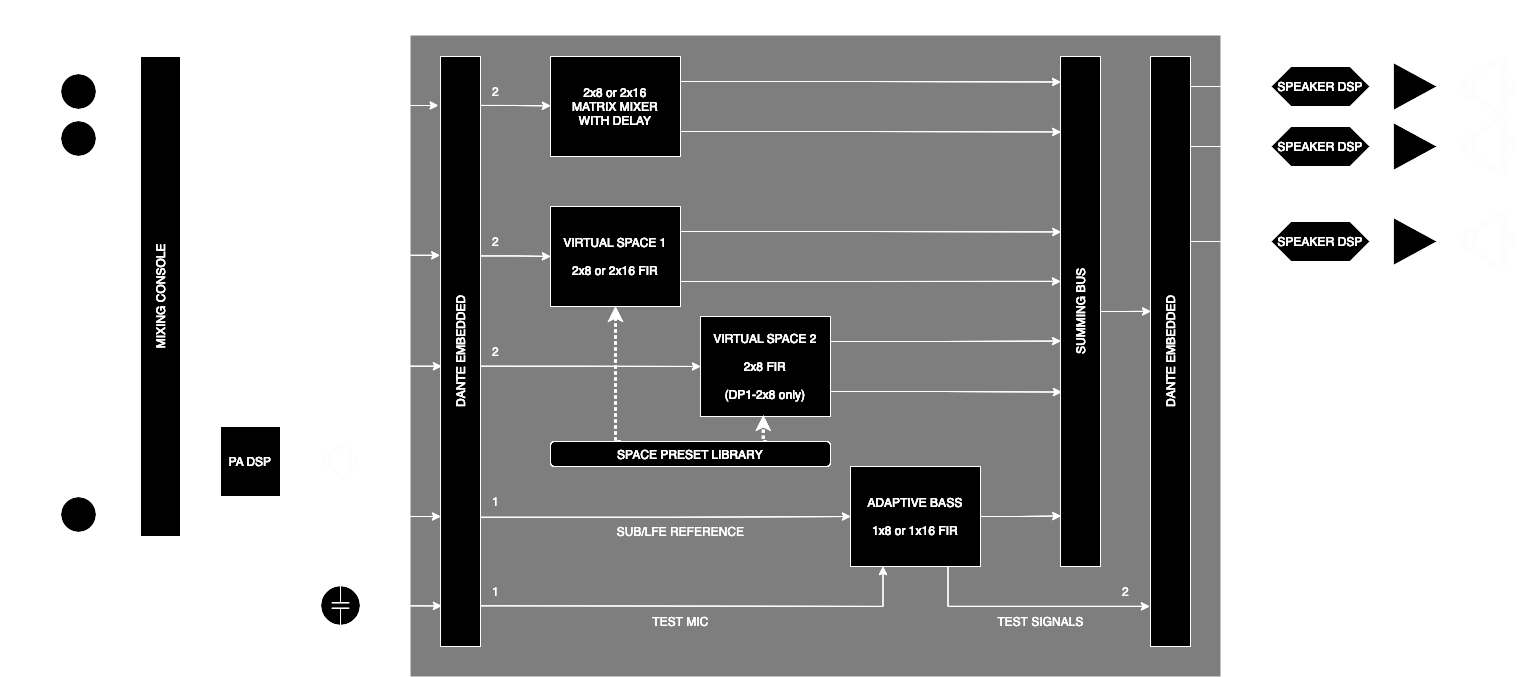
When installed in a fixed audio system, the DP1 typically receives signals from the audio mixing console and creates the necessary loudspeaker signals to feed around the room. In addition, test input and output signals are used for calibrating the adaptive bass subsystem.
The diagram below shows the signal flow and basic functions of the DP1 processor and its relationship to external equipment.
¶ Input signals
- Sub/LFE Reference: This signal should contain an exact, unchanging copy of the audio sent to the main audio system's subwoofers. After calibration, the DP1 uses this signal to generate the complementary adaptive bass signals driven to the active acoustics subwoofers. If at any point the layout, tuning or relative level of the main subwoofer system is modified, the active bass calibration must be repeated.
- Test mic: An omnidirectional reference microphone is used during room commissioning to allow the adaptive bass system to self-adjust. Route signal from the microphone preamp to this input. This may be disconnected after commissioning is complete.
- Surround: Typically, connect these inputs to a separate stereo bus off the mixing console. Signals routed to this bus can be assigned via a delay/gain matrix to each room loudspeaker, allowing "dry" use of the room loudspeakers for surround effects. It may be desirable to "link" the panning of this bus to the channel pan position, as well as set this aux bus to a "post-fade" point so the channel fader affects its level.
- Space 1: Typically, connect these inputs to a separate stereo bus off the mixing console. Signals routed to this bus will be introduced into the virtual room sound loaded into Space 1. Please "link" the panning of this bus to the channel pan position, as well as set this aux bus to a "post-fade" point so the channel fader affects its level.
- Space 2 (DP1-2x8 only): Same as Space 1 above, but signals will be introduced into a second room "sound" selected as Space 2.
¶ Output Signals
- Loudspeaker 1-8: Connect to a loudspeaker processor/amplifier channel to drive 8 loudspeaker positions. Note, with external crossovers one DP1 output channel can be shared between a mid/high-frequency loudspeaker (such as an FX-43) and a subwoofer (such as an FXL-15) to save on processing channels.
- Loudspeaker 9-16 (DP1-1x16 only): Same as above.
- Test Output - Sub/LFE: Generates test signals used during the commissioning process for adaptive bass processing. Feed through the mixing console and to the "house" subwoofer system.
- Test Output - Adaptive: Generates test signals used during the commissioning process for adaptive bass processing. Feed through the mixing console and to the Sub/LFE Reference input of the DP1 processors.
¶ Dante audio patching
DP1 will appear in Dante Controller with 32 channels of input and output. Depending on system mode, up to 8 inputs and 18 outputs may be required for patching. These may be connected to other devices in your system (mixing consoles, signal processors, preamplifiers, etc.). Note that standard Dante unicast and multicast rules may be employed, as long as all devices connected are using the same 48kHz sampling rate and a common clock master.
In a system with multiple DP1 processors, simply patch the same input signals to each DP1 through unicast or multicast patching.
¶ DP1-2x8
| Dante Channel | Input | Output |
|---|---|---|
| 1 | Sub/LFE Reference | Loudspeaker 1 |
| 2 | Test Mic | Loudspeaker 2 |
| 3 | Surround L | Loudspeaker 3 |
| 4 | Surround R | Loudspeaker 4 |
| 5 | Space 1 L | Loudspeaker 5 |
| 6 | Space 1 R | Loudspeaker 6 |
| 7 | Space 2 L | Loudspeaker 7 |
| 8 | Space 2 R | Loudspeaker 8 |
| 17 | - | Test Output - Sub/LFE |
| 18 | - | Test Output - Adaptive |
¶ DP1-1x16
| Dante Channel | Input | Output |
|---|---|---|
| 1 | Sub/LFE Reference | Loudspeaker 1 |
| 2 | Test Mic | Loudspeaker 2 |
| 3 | Surround L | Loudspeaker 3 |
| 4 | Surround R | Loudspeaker 4 |
| 5 | Space 1 L | Loudspeaker 5 |
| 6 | Space 1 R | Loudspeaker 6 |
| 7 | - | Loudspeaker 7 |
| 8 | - | Loudspeaker 8 |
| 9 | - | Loudspeaker 9 |
| 10 | - | Loudspeaker 10 |
| 11 | - | Loudspeaker 11 |
| 12 | - | Loudspeaker 12 |
| 13 | - | Loudspeaker 13 |
| 14 | - | Loudspeaker 14 |
| 15 | - | Loudspeaker 15 |
| 16 | - | Loudspeaker 16 |
| 17 | - | Test Output - Sub/LFE |
| 18 | - | Test Output - Adaptive |
¶ Managing Configurations
DP1 processors periodically save their current configuration data whenever it changes, so they immediately return to their previous state on power up. It is always a good measure to save your configuration locally as a backup in case you have to replace your server or reset it.
It is perfectly acceptable to close VUI and choose not to save your config. This will not stop the running state and active settings of the DP1 Processor you're connected to.
¶ Saving
To save your configuration, use the SAVE button located under the FILE menu or use the keyboard shortcut Windows: Ctrl+S, Mac OSX: CMD+S. When you save a copy of the configuration file locally, the DP1 server will mirror the filename you chose for information purposes.
¶ Loading from File
If you've saved your configuration locally, you can reload it from file by choosing FILE > OPEN. Once you open your configuration, VUI will attempt to automatically connect to the servers and show their current status. Refer to the PROCESSORS tab for connection status.
¶ Loading from the Processor
If you don't have your configuration saved locally, or your local configuration is possibly out of date, you can always load the running configuration from the DP1 processor. To do so, ensure that no configurations are currently loaded by choosing FILE > NEW. Then navigate to the PROCESSORS tab and connect to the DP1 processor using the steps outlined previously. Once connected, VUI will automatically fetch the configuration from the DP1 server and load it to your current window.
¶ System commissioning
¶ Loading space preset library files
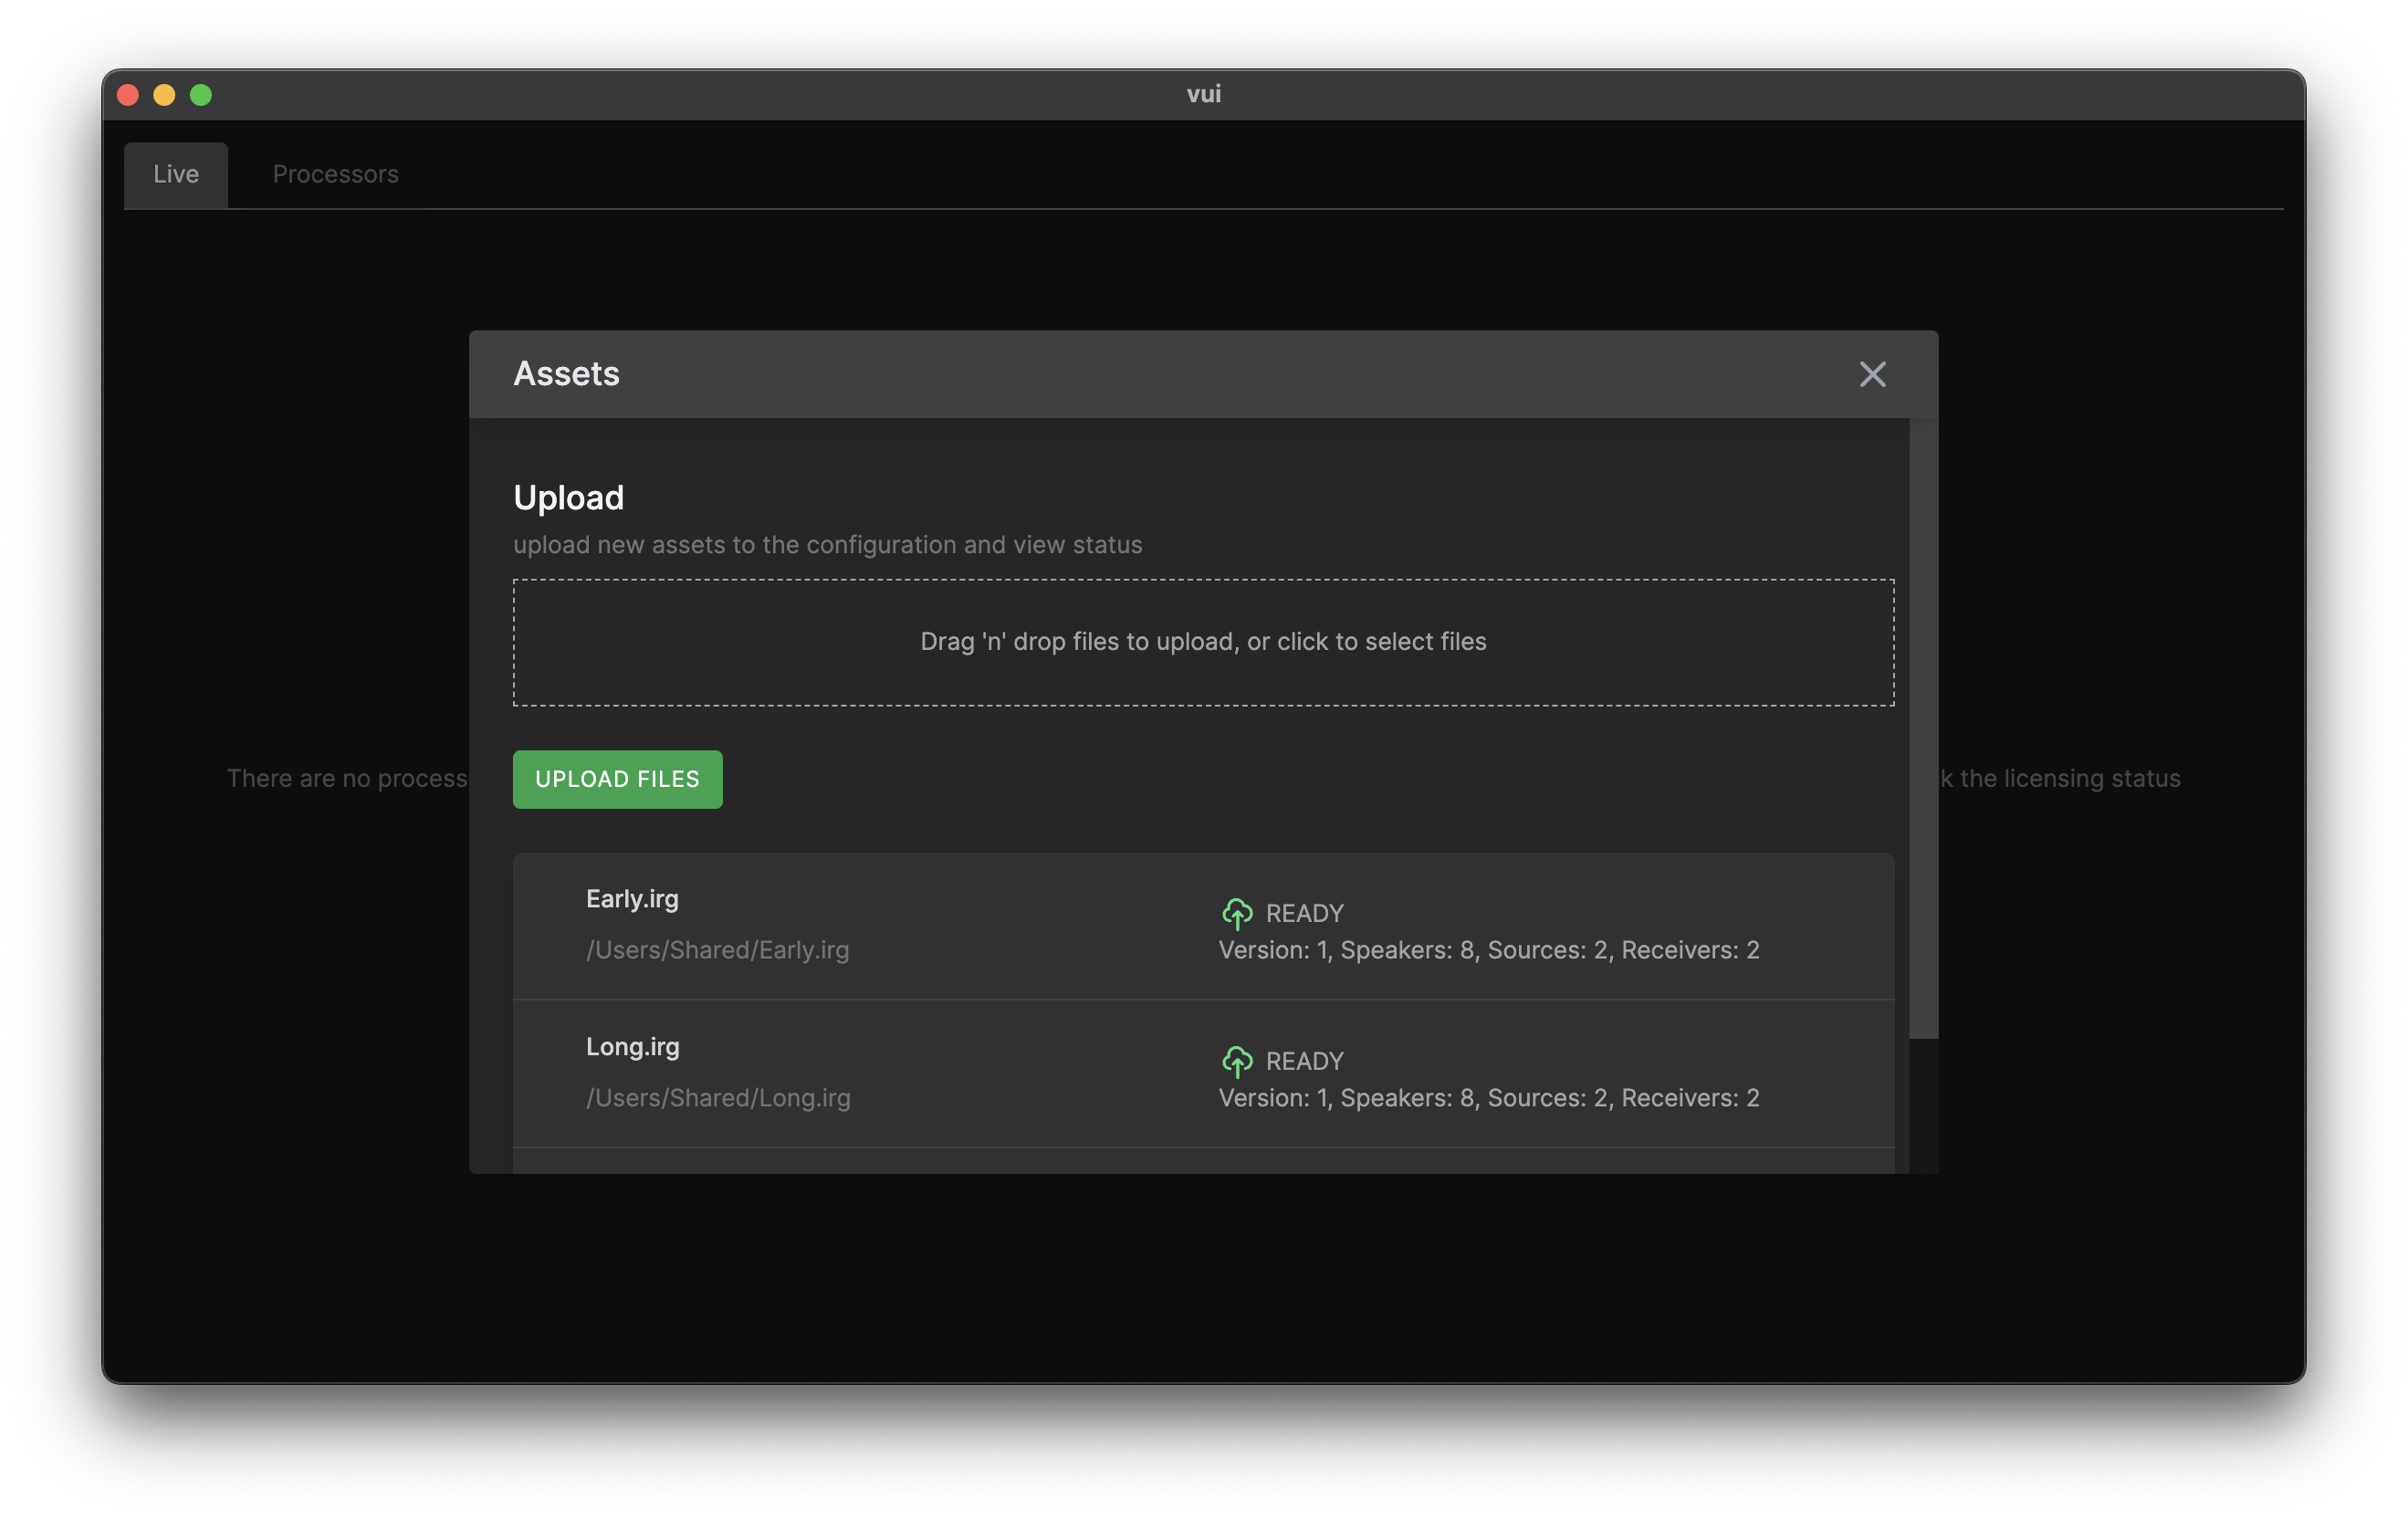
Presets for the augmented active acoustics system must be uploaded to the server network in order to be selected for use. Each preset is contained inside a file with the extension .irg, and each file encapsulates the sonic characteristics of one virtual room simulation at multiple acoustic source and listener locations. Preset files will be provided for each installation, and are custom to the loudspeaker system configuration and geometry of that space; preset files are not interchangable between installations.
To upload a preset to the system, once connected to the processors, choose FILE > ASSETS. The following window will appear. You may drag-and-drop the .irg files into this window, or click to select files on your computer with a file browser. After choosing the files to upload, click UPLOAD FILES which will transmit the .irg files to all servers on the network.
¶ Assigning loudspeaker channels
Each .irg file contains separate processing information for each loudspeaker in the installation. Since there may be multiple DP1 processors required for larger installations, we must "map" between the loudspeaker definitions in the .irg file and the physical output channels available.
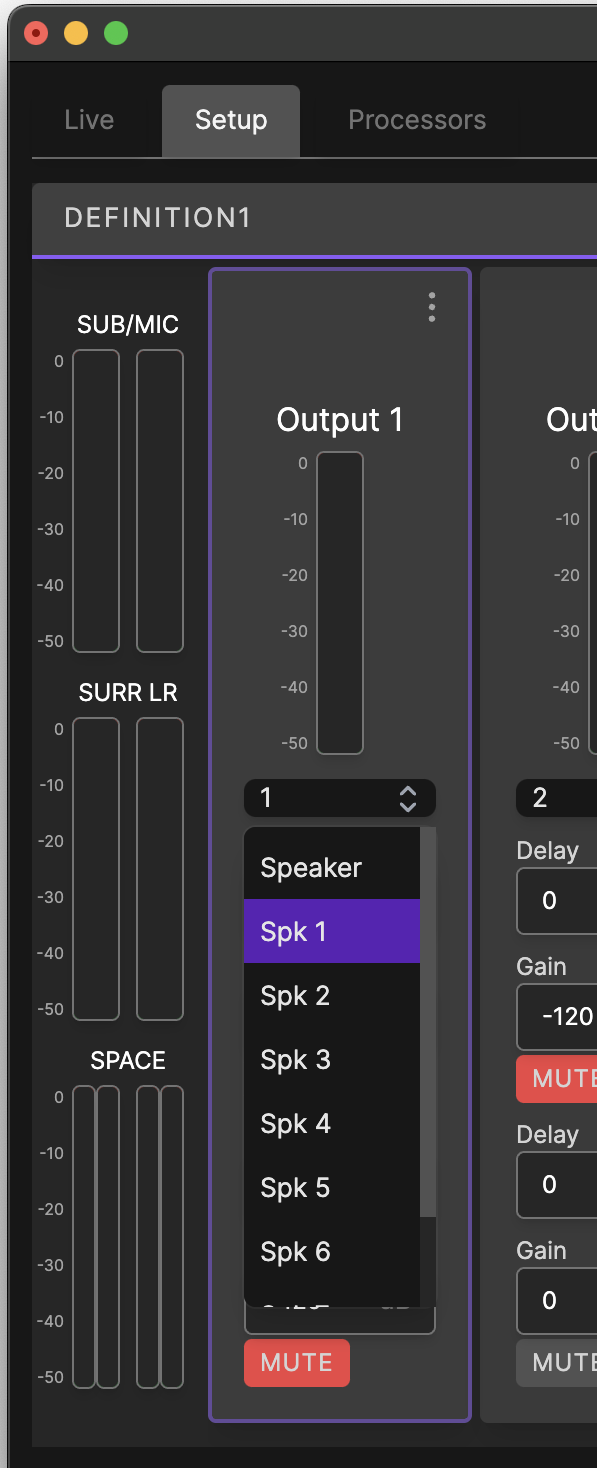
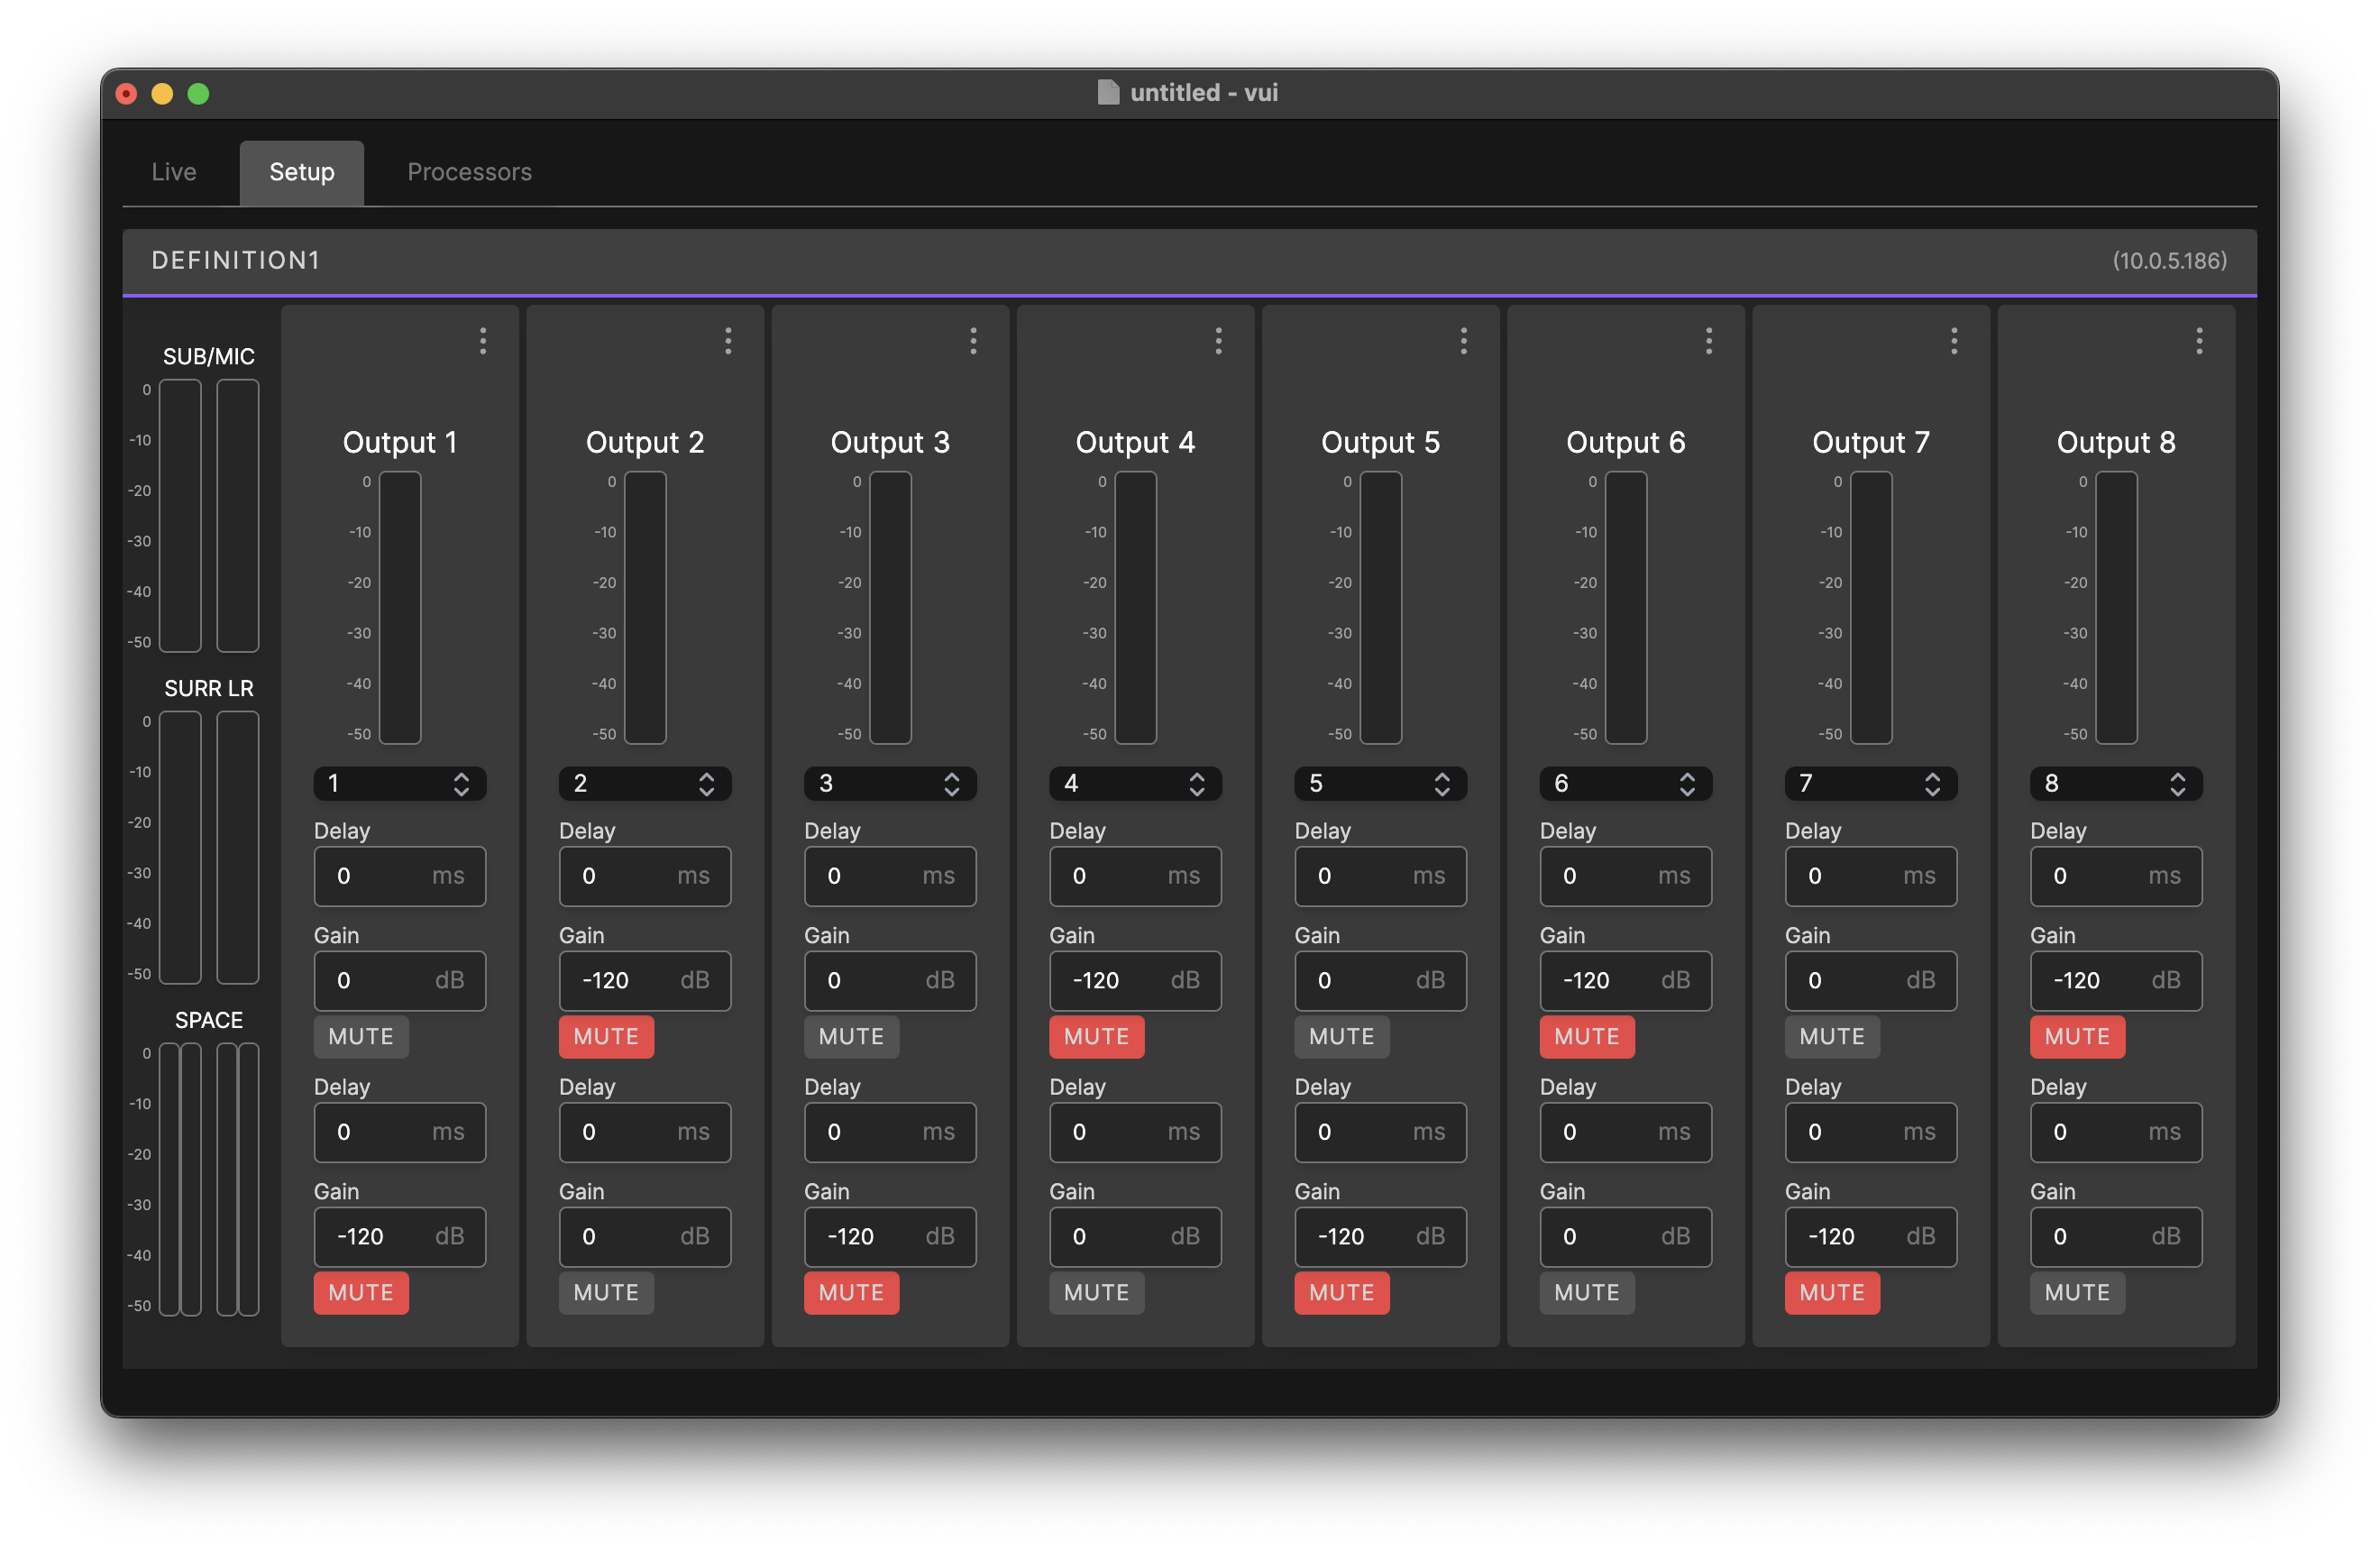
Navigate to the SETUP tab in VUI. Each processor on the network will be visible, along with a vertical channel strip for each output channel. For each output channel strip, pull down and select the loudspeaker ID associated with that physical output. Note this configuration is installation-specific and stored in the configuration file after commissioning.
¶ Configuring the surround matrix
The SETUP tab also shows a gain & delay matrix for routing signals from the Surround inputs to the physical loudspeaker output channels. For each crosspoint, you may adjust mute, gain and time delay to create whatever loudspeaker signal routing you desire. Note, the time delay selected in this view is in addition to the block processing latency of the system.
¶ Adaptive bass control calibration
If the installation is equipped with low-frequency loudspeakers for adaptive bass control, a calibration process must be employed that generates the filters used for optimizing bass response in the room.
Connect all signals as described in the patching reference. The reference microphone will be physically moved throughout the room, located sequentially roughly 2-4 feet from each Definition subwoofer.
Care must be taken to ensure that the test signal (generated by the DP1 processor) is of sufficient level to overcome room noise. In addition, ensure that the relative "gain" through the mixing console is identical between the signals driving the LFE subwoofers and the "return" signals driving the DP1.
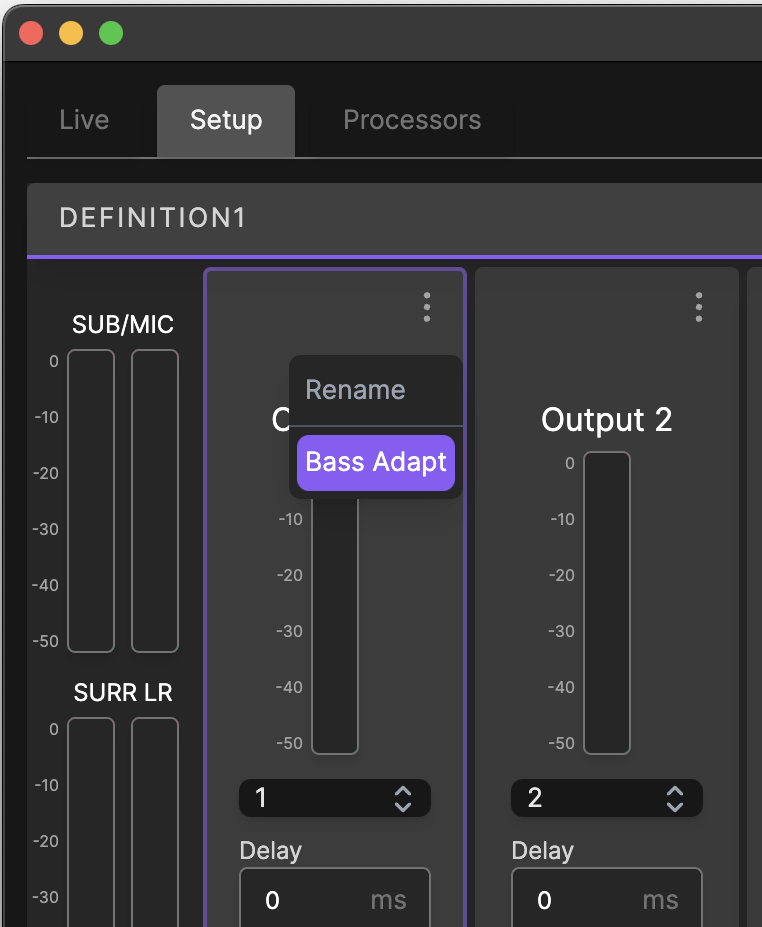
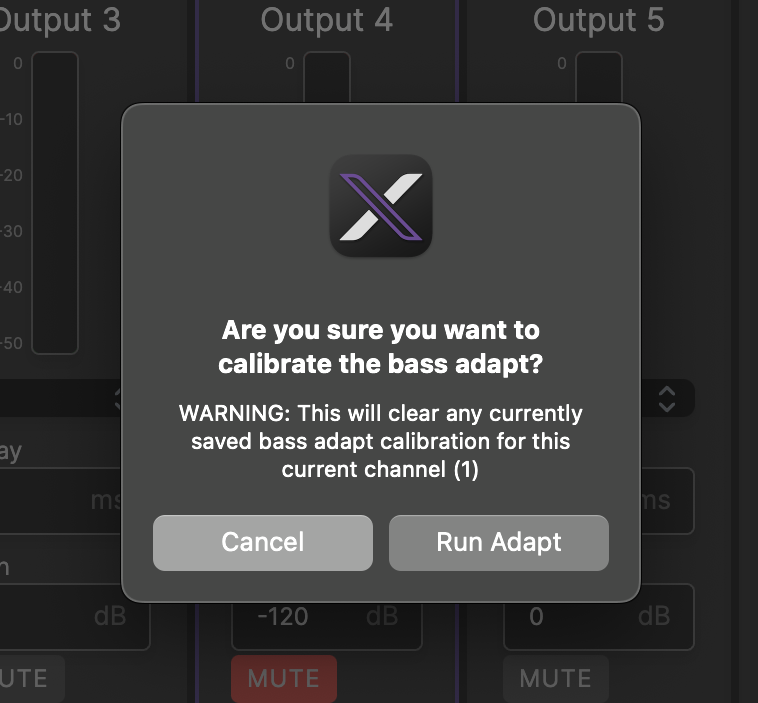
When ready, click the ⋮ options drop-down menu, and choose Bass Adapt for the channel in question. Confirm by clicking Run Adapt. The system will then output two sweeps, one enemating from the "house" subwoofers/LFE channel, and one enemating from the Definition subwoofer channel selected. Once completed, move to the next Definition subwoofer and repeat the same procedure on that channel, until all Definition subwoofers have been measured and adapted.
¶ Live operation
The Live tab provides monitoring and control during typical operation of the system for live performance. On this tab, each DP1 processor is shown along with its associated signal input and output levels for monitoring. Hovering over any meter shows real-time levels for that channel.
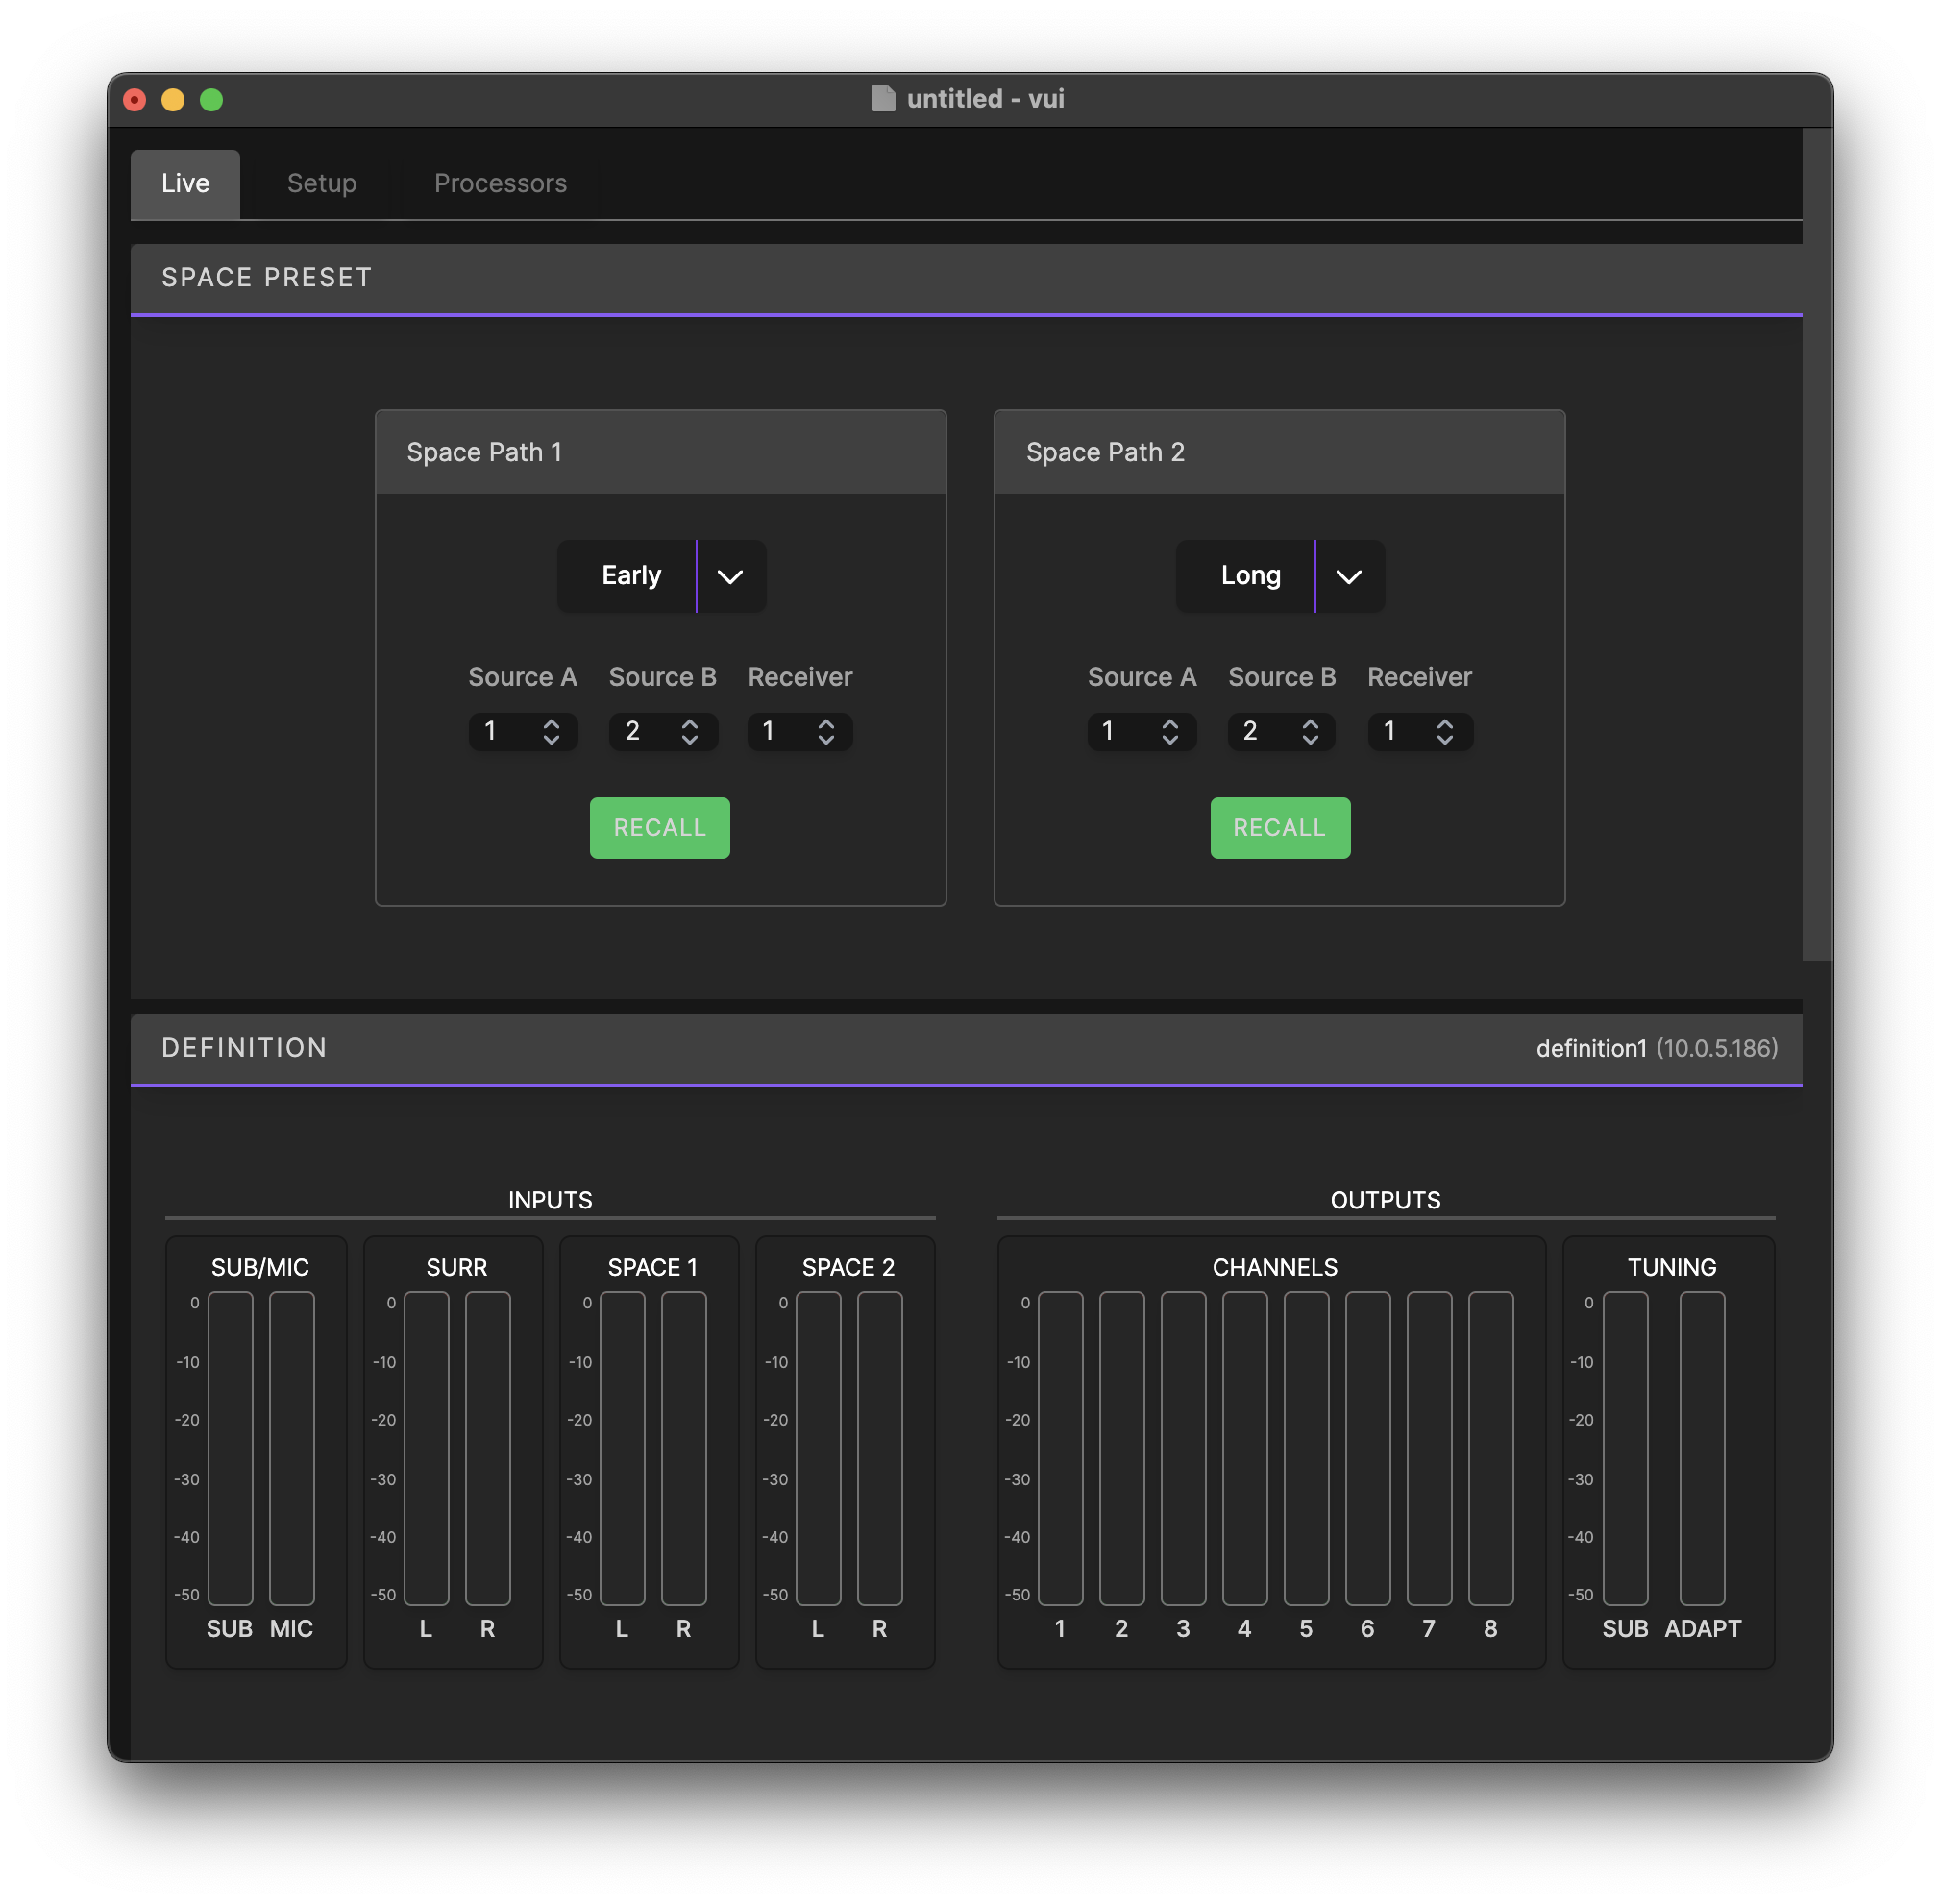
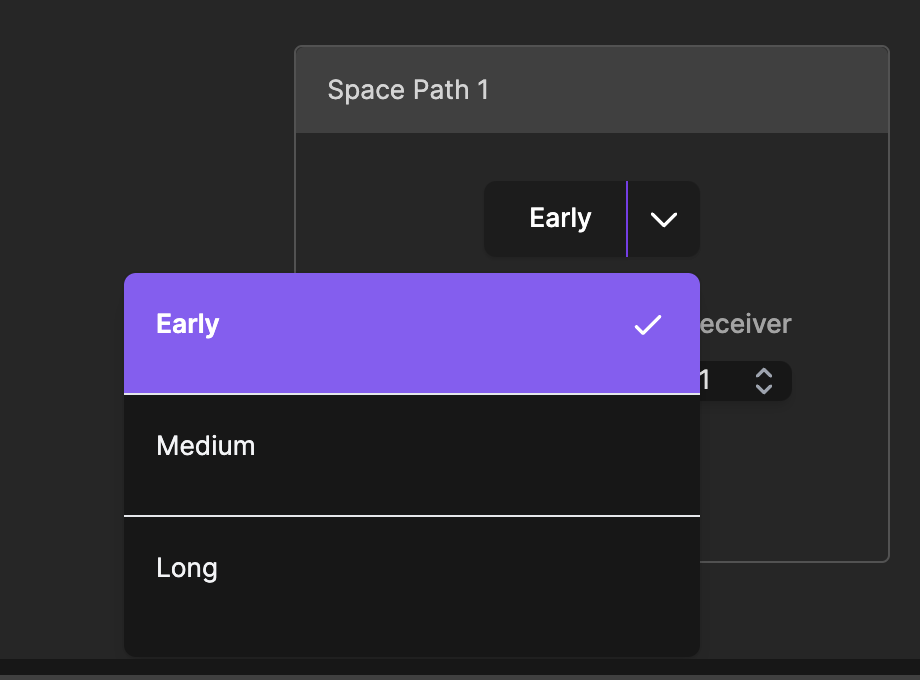
If DP1 processors are present on the network, Preset files have been uploaded, and loudspeakers routed, a window labeled Space Presets is shown. In this window, the operator may choose which preset(s) are loaded in each space simulation channel. Simply drop down the included menu and choose a desired preset. The room simulation will change when you click the RECALL button.
You may also choose to reassign the virtual source and listener positions in this window, if the preset files contain additional options. Note, the default values are typically recommended here.
¶ Specifications
| Power Supply | Internal 100V-240V, 6.5A-3.5A at 50/60 Hz |
| Power Consumption | 450W |
| Audio Input | 8 Channels of Dante™ network audio, 48kHz only (DP1-2x8) |
| 6 Channels of Dante™ network audio, 48kHz only (DP1-1x16) | |
| Audio Output | 10 Channels of Dante™ network audio, 48kHz only (DP1-2x8) |
| 18 Channels of Dante™ network audio, 48kHz only (DP1-1x16) | |
| Frequency Response | 20Hz to 20kHz |
| Network | 1000/100 Mbps ethernet for Dante™ and Control, 1000/100 Mbps ethernet for optional Control |
| Dimensions (W x H x D) | 434 x 42.8 x 595.6 mm (17.1 x 1.69 x 23.5 in)1 |
| Weight | 12.2 kg (29.9 lb), accessories and packaging not included |
1Dimensions do not include bezel
